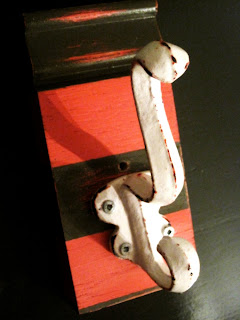
After a long search, I just couldn't find what I was looking for. But for a couple of bucks and a bit of paint, I could make my own...
I started off by finding a hook that fit the look I was after- something with a bit of personality and that would distress well. These hooks were $2 each at Home Depot. Done. Secondly, I wanted a background to mount the hooks to. I found these scraps of moulding in the cut pile. Apparently, they were going to get tossed anyways, so I snagged 2 of them.
For the hooks and the wood pieces, I began by painting them solid colors. Once dry, I layered with a different color to hide the original color. Once two coats were really dry, I took some 150 grit sand paper to lightly buff and distress the hooks and backings.
The colors I used on the blue and white hook were: White Chocolate and Peacock Blue from Benny Moore. The pink and brown hook featured: Magnolia Grandiflora, Bay Colt, and Terra Rosa (all from Martha Stewart's paint line). I really wanted to achieve a vintage-y feel, and sought to use colors that looked a bit aged, and the distressing really carried it from there. Once the distressing was completed, I gave everything a quick coat of diamond finish Varathane in high gloss, and things started to shine (literally).
When it was time to attach the hooks to the backing, I initially used the screws that came with the hooks (picture this: drywall screws going into wood)... you guessed it- I snapped a screw in half. Typical. After I gave my head a good shake, I found some wood screws, and that was that.
If I could change anything about the project it would be for a slimmer piece of wood to mount on. But, seeing as it was a freebie, I don't think I'm going to complain too much. This project was so easy to do, and was practically free!
Since having the project completed, I've received great compliments on the design itself, and as per Jackie's awesome recommendation, I've decided to make a few and sell them. If you're interested in obtaining one of these handmade beauties, head over to my Etsy shop for more details!


No comments:
Post a Comment